(Adding categories) |
(→Setup: added rules alteration by FAQ 5.1.1) Tag: Visual edit |
||
| (12 intermediate revisions by 4 users not shown) | |||
| Line 1: | Line 1: | ||
== Rule == |
== Rule == |
||
| − | Each ship has a [[Size Class|size class]]. Huge ships |
+ | Each ship has a [[Size Class|size class]]. Huge ships feature one ship token placed on top of two 76 mm x 129 mm large ship bases. |
| + | Huge ships follow all the rules governing ships in the Star Wars: Armada [[Rules|rule booklets]]. A huge ship consists of two ship bases, a ship model, a ship token, and a ship sheet. A ship sheet contains the same elements as other [[Ship Card|ship cards]] and is treated as a ship card for the pruposes of rules and game effects. |
||
| − | Huge ships were introduced with [[Super Star Destroyer Expansion Pack]]. They differ from other size classes in the following aspects. A huge ship... |
||
| − | * ... features a total of six [[Hull Zone|firing arcs]]—supplementing the standard front, rear, left, and right firing arcs with brand-new right-auxiliary and left-auxiliary firing arcs |
||
| − | * ... can make up to three [[Attack|attacks]] from different firing arcs every [[round]] of the game. |
||
| − | * ... has the unique ability to pass. Once per round, when you would have to activate the huge ship, you can choose instead to pass, allowing your opponent to activate one of his ships. |
||
| ⚫ | |||
| + | ==Additional Rules for Huge Ships== |
||
| ⚫ | |||
| + | ==='''Firing Arcs'''=== |
||
| + | A huge ship has <u>six</u> [[Hull Zone|firing arcs]]. In addition to the front, left, right, and rear firing arcs, huge ships have two auxiliary [[Hull Zone|hull zones]]: <u>right-auxiliary</u> and <u>left-auxiliary</u>. These auxiliary hull zones are adjacent to the hull zones specified below. |
||
| + | * The right auxiliary hull zone is adjacent to the right and rear hull zones. |
||
| + | * The left auxiliary hull zone is adjacent to the left and rear hull zones. |
||
| + | Game effects that specifically refer to the left or right hull zones do not apply their effects to the auxiliary hull zones. |
||
| + | |||
| + | ==='''Pass Tokens'''=== |
||
| + | Once per round when it is a huge ship's turn to activate, it may receive a pass token to [[pass]] its turn instead of [[Ship Phase|activating]] (its opponent activates a ship instead). A ship with a pass token must still activate during the Ship Phase. All pass tokens are removed during the [[Status Phase]]. |
||
| + | |||
| + | ==='''Setup'''=== |
||
| + | The following rules modify the [[Setup|setup rules]]. These rules only apply to huge ships. |
||
| + | |||
| + | '''Deploy Ships''': When a player [[Deployment|deploys ]]a huge ship, <u>it may extend outside of that player’s deployment zone as long as its base is completely within the setup area and touching that player’s play area edge.</u><blockquote>Source: [https://images-cdn.fantasyflightgames.com/filer_public/a8/52/a8529093-17c3-439b-8710-04f2de309e67/armada_faq_v511-compressed.pdf FAQ 5.1.1; 2020/03/09]</blockquote>A huge ship cannot be deployed [[Overlapping |overlapping ]][[Obstacles|obstacles]]. |
||
| + | |||
| + | '''Squadrons''' placed [[Range and Distance|within distance 1-2]] of a huge ship that extends beyond its player's deployment zone must also be placed within distance 1-2 of that player's deployment zone. |
||
| + | |||
| + | ==='''Command Dials'''=== |
||
| ⚫ | |||
| + | ==='''Attack'''=== |
||
| + | A huge ship can perform up to three [[Attack|attacks ]]during its activation (instead of up to two). It cannot attack from the same hull zone more than once per activation. |
||
| + | |||
| + | ==='''Ship Movement'''=== |
||
| + | |||
| + | The following rules modify the [[Move Ship|ship movement]]. These rules only apply for huge ships. |
||
| + | |||
| + | '''Determine Course''': Due to the size of huge ships, some maneuvers cause the ship to overlap the [[Maneuver Tool|maneuver tool]] whether it is placed on either side of the ship. When performing the [[Determine Course|determine course]] step of the ship's maneuver, any course that would cause the ship to overlap the maneuver tool is an illegal maneuver and cannot be performed. Determine a different course instead. |
||
| + | |||
| + | '''Move Ship''': When placing the maneuver tool, insert the guides of the first segment into the notches on one side of the <u>rear ship base</u> (instead of the front ship base). When placing the ship at the joint corresponding to its [[speed]], slide the notches of the rear ship base over the guides at that joint. |
||
| + | ==='''Scoring'''=== |
||
| + | When players [[Winning|determine their scores]] at the end of the game, a player's score includes half of the total [[Fleet Building|fleet point cost]] (rounded up) of each '''crippled''' enemy huge ship in the play area. A huge ship is crippled if it has a number of [[Damage Deck|damage cards]] equal to at least half of its [[Damage|hull value]], rounded up. A crippled huge ship's fleet point cost includes the cost of all upgrade cards equipped to that ship. |
||
| + | |||
| + | === '''Upgrade Bar''' === |
||
| + | A huge ship cannot equip [[Upgrade Cards|upgrade cards]] that add upgrade icons to its [[Upgrade Bar|upgrade bar]]. |
||
| + | |||
| + | |||
| + | |||
| ⚫ | |||
| + | |||
| + | == See also == |
||
| + | * [[Small Base|Small Sized Ship]] |
||
| + | * [[Medium Base|Medium Sized Ship]] |
||
| + | * [[Large Base|Large Sized Ship]] |
||
| + | |||
| + | == Video == |
||
| + | * [https://www.youtube.com/watch?v=gomPiJ1ASkw FFG Live: Star Wars Armada - April 2nd, 2019] |
||
[[Category:Ship Cards]] |
[[Category:Ship Cards]] |
||
[[Category:Rules]] |
[[Category:Rules]] |
||
Revision as of 19:24, 2 March 2020
Rule
Each ship has a size class. Huge ships feature one ship token placed on top of two 76 mm x 129 mm large ship bases.
Huge ships follow all the rules governing ships in the Star Wars: Armada rule booklets. A huge ship consists of two ship bases, a ship model, a ship token, and a ship sheet. A ship sheet contains the same elements as other ship cards and is treated as a ship card for the pruposes of rules and game effects.
Additional Rules for Huge Ships
Firing Arcs
A huge ship has six firing arcs. In addition to the front, left, right, and rear firing arcs, huge ships have two auxiliary hull zones: right-auxiliary and left-auxiliary. These auxiliary hull zones are adjacent to the hull zones specified below.
- The right auxiliary hull zone is adjacent to the right and rear hull zones.
- The left auxiliary hull zone is adjacent to the left and rear hull zones.
Game effects that specifically refer to the left or right hull zones do not apply their effects to the auxiliary hull zones.
Pass Tokens
Once per round when it is a huge ship's turn to activate, it may receive a pass token to pass its turn instead of activating (its opponent activates a ship instead). A ship with a pass token must still activate during the Ship Phase. All pass tokens are removed during the Status Phase.
Setup
The following rules modify the setup rules. These rules only apply to huge ships.
Deploy Ships: When a player deploys a huge ship, it may extend outside of that player’s deployment zone as long as its base is completely within the setup area and touching that player’s play area edge.
Source: FAQ 5.1.1; 2020/03/09
A huge ship cannot be deployed overlapping obstacles.
Squadrons placed within distance 1-2 of a huge ship that extends beyond its player's deployment zone must also be placed within distance 1-2 of that player's deployment zone.
Command Dials
When a huge ship reveals its command dial, also assign the corresponding command token to that ship.
Attack
A huge ship can perform up to three attacks during its activation (instead of up to two). It cannot attack from the same hull zone more than once per activation.
Ship Movement
The following rules modify the ship movement. These rules only apply for huge ships.
Determine Course: Due to the size of huge ships, some maneuvers cause the ship to overlap the maneuver tool whether it is placed on either side of the ship. When performing the determine course step of the ship's maneuver, any course that would cause the ship to overlap the maneuver tool is an illegal maneuver and cannot be performed. Determine a different course instead.
Move Ship: When placing the maneuver tool, insert the guides of the first segment into the notches on one side of the rear ship base (instead of the front ship base). When placing the ship at the joint corresponding to its speed, slide the notches of the rear ship base over the guides at that joint.
Scoring
When players determine their scores at the end of the game, a player's score includes half of the total fleet point cost (rounded up) of each crippled enemy huge ship in the play area. A huge ship is crippled if it has a number of damage cards equal to at least half of its hull value, rounded up. A crippled huge ship's fleet point cost includes the cost of all upgrade cards equipped to that ship.
Upgrade Bar
A huge ship cannot equip upgrade cards that add upgrade icons to its upgrade bar.
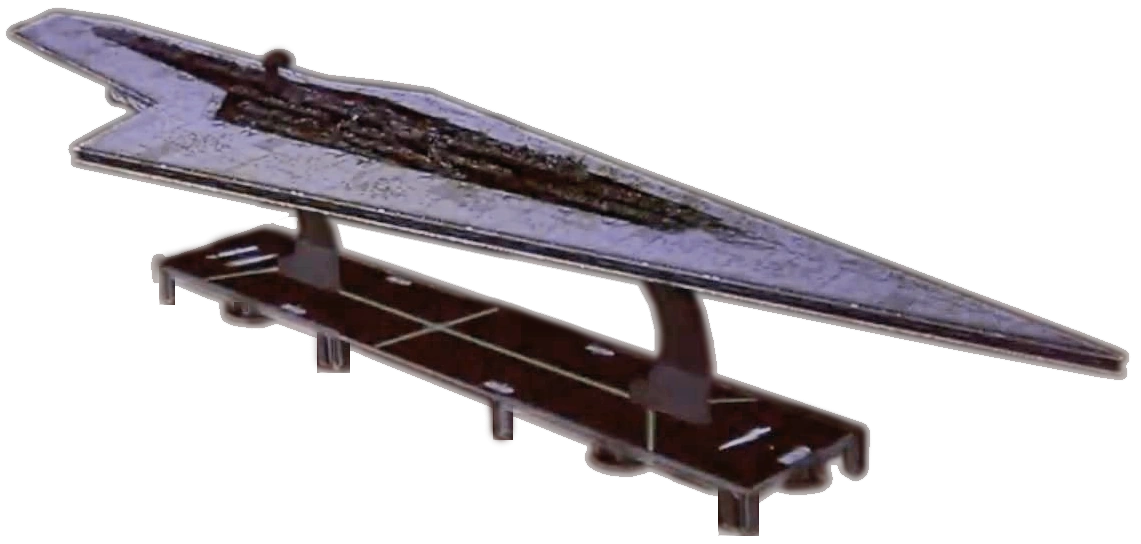
Star Dreadnought upon two standard large bases.
See also
Video
-

Executor I-class Star Dreadnought -
Star Dreadnought Command Prototype -

Star Dreadnought Assault Prototype -

Executor II-class Star Dreadnought
All items (4)


