No edit summary Tag: rte-source |
(added link) Tag: Visual edit |
||
| (24 intermediate revisions by 4 users not shown) | |||
| Line 1: | Line 1: | ||
| + | These charts are intended to provide quick comparisons between squadron stats. |
||
| − | == Empire == |
||
| − | {| class="article-table" |
||
| − | !Name |
||
| − | !Points |
||
| − | ![[File:Icon_Speed.png]] |
||
| − | ![[File:Icon_Hull.png]] |
||
| − | ![[File:Icon_AntiSquadronAttackDice.png]] |
||
| − | ![[File:Icon_AntiShipAttackDice.png]] |
||
| − | ![[Squadron Keyword|'''Squadron Keywords''']] |
||
| − | !Special |
||
| − | Rules |
||
| − | !Defense |
||
| − | Tokens |
||
| − | |- |
||
| − | |[[TIE Advanced Squadron]] |
||
| − | |12 |
||
| − | |4 |
||
| − | |5 |
||
| − | |[[File:Icon_Die_Blue.png]][[File:Icon_Die_Blue.png]][[File:Icon_Die_Blue.png]] |
||
| − | |[[File:Icon_Die_Black.png]] |
||
| − | |'''[[File:Icon_SQKey_Escort.png]] [[escort|Escort]]''' |
||
| − | | |
||
| − | | |
||
| − | |- |
||
| − | |•[[Darth Vader TIE Advanced Squadron]] |
||
| − | |21 |
||
| − | |4 |
||
| − | |5 |
||
| − | |[[File:Icon_Die_Black.png]][[File:Icon_Die_Blue.png]][[File:Icon_Die_Blue.png]][[File:Icon_Die_Blue.png]] |
||
| − | |[[File:Icon_Die_Black.png]] |
||
| − | |'''[[File:Icon_SQKey_Escort.png]] [[escort|Escort]]''' |
||
| − | |"While attacking, each of your [[File:Icon_Dice_Crit.png|link=http://starwars-armada.wikia.com/wiki/File:Icon_Dice_Crit.png]] icons adds 1 damage to the damage total." |
||
| − | |[[File:Icon_DefToken_Brace.png]] [[File:Icon_DefToken_Brace.png]] |
||
| − | |- |
||
| − | |[[TIE Bomber Squadron]] |
||
| − | |9 |
||
| − | |4 |
||
| − | |5 |
||
| − | |[[File:Icon_Die_Black.png]] |
||
| − | |[[File:Icon_Die_Black.png]] |
||
| − | |'''[[File:Icon_SQKey_Bomber.png]] [[bomber|Bomber]][[File:Icon_SQKey_Heavy.png]] [[heavy|Heavy]]''' |
||
| − | | |
||
| − | |[[Brace|<nowiki/>]][[Redirect|<nowiki/>]] |
||
| − | |- |
||
| − | |•[[Major Rhymer TIE Bomber Squadron]] |
||
| − | |16? |
||
| − | |4 |
||
| − | |5 |
||
| − | |[[File:Icon_Die_Black.png]][[File:Icon_Die_Blue.png]] |
||
| − | |[[File:Icon_Die_Black.png]] |
||
| − | |'''[[File:Icon_SQKey_Bomber.png]] [[bomber|Bomber]][[File:Icon_SQKey_Heavy.png]] [[heavy|Heavy]]''' |
||
| − | |"Friendly squadrons at distance 1 can attack enemy ships at close-medium range using all dice in their battery armament." |
||
| − | |[[File:Icon_DefToken_Brace.png]] [[File:Icon_DefToken_Brace.png]] |
||
| − | |- |
||
| − | |[[TIE Fighter Squadron]] |
||
| − | |8 |
||
| − | |4 |
||
| − | |3 |
||
| − | |[[File:Icon_Die_Blue.png]][[File:Icon_Die_Blue.png]][[File:Icon_Die_Blue.png]] |
||
| − | |[[File:Icon_Die_Blue.png]] |
||
| − | |'''[[File:Icon_SQKey_Swarm.png]] [[swarm|Swarm]]'''''<nowiki/>'' |
||
| − | | |
||
| − | | |
||
| − | |- |
||
| − | |•[["Howlrunner" TIE Fighter Squadron]] |
||
| − | |16 |
||
| − | |4 |
||
| − | |3 |
||
| − | |[[File:Icon_Die_Blue.png]][[File:Icon_Die_Blue.png]][[File:Icon_Die_Blue.png]] |
||
| − | |[[File:Icon_Die_Blue.png]] |
||
| − | |'''[[File:Icon_SQKey_Swarm.png]] [[swarm|Swarm]]''' |
||
| − | |"While a friendly squadron with [[Swarm|'''Swarm''']] at distance 1 is attacking another squadron, it may add 1 blue die to its attack pool." |
||
| − | |[[File:Icon_DefToken_Brace.png]] [[File:Icon_DefToken_Scatter.png]] |
||
| − | |- |
||
| − | |•[["Mauler" Mithel TIE Fighter Squadron]] |
||
| − | |15 |
||
| − | |4 |
||
| − | |3 |
||
| − | |[[File:Icon_Die_Blue.png]][[File:Icon_Die_Blue.png]][[File:Icon_Die_Blue.png]] |
||
| − | |[[File:Icon_Die_Blue.png]] |
||
| − | |'''[[File:Icon_SQKey_Swarm.png]] [[swarm|Swarm]]''' |
||
| − | |"After you move, each squadron engaged with you suffers 1 damage." |
||
| − | |[[File:Icon_DefToken_Brace.png]] [[File:Icon_DefToken_Scatter.png]] |
||
| − | |- |
||
| − | |[[TIE Interceptor Squadron]] |
||
| − | |11 |
||
| − | |5 |
||
| − | |3 |
||
| − | |[[File:Icon_Die_Blue.png]][[File:Icon_Die_Blue.png]][[File:Icon_Die_Blue.png]][[File:Icon_Die_Blue.png]] |
||
| − | |[[File:Icon_Die_Blue.png]] |
||
| − | |''[[File:Icon_SQKey_Counter.png]][[counter|'''Counter''']]'''2'''''[[File:Icon_SQKey_Swarm.png]] [[swarm|'''Swarm''']]'''<nowiki/>''' |
||
| − | | |
||
| − | | |
||
| − | |- |
||
| − | |•[[Soontir Fel TIE Interceptor Squadron]] |
||
| − | |18 |
||
| − | |5 |
||
| − | |3 |
||
| − | |[[File:Icon_Die_Blue.png]][[File:Icon_Die_Blue.png]][[File:Icon_Die_Blue.png]][[File:Icon_Die_Blue.png]] |
||
| − | |[[File:Icon_Die_Blue.png]] |
||
| − | |''[[File:Icon_SQKey_Counter.png]][[counter|'''Counter''']]'''2'''''[[File:Icon_SQKey_Swarm.png]] [[swarm|'''Swarm''']]'''<nowiki/>''' |
||
| − | |"After a squadron you are engaged with performs a non-'''[[counter|Counter]]''' attack, it suffers 1 damage if it did not attack you." |
||
| − | |[[File:Icon_DefToken_Brace.png]] [[File:Icon_DefToken_Scatter.png]][[Redirect|<nowiki/>]] |
||
| − | |} |
||
| − | == |
+ | == Overview all squadrons == |
| + | [[File:SquadCompChart Wiki all.jpg|676x676px]] |
||
| − | {| class="article-table" |
||
| − | !Name |
||
| − | !Points |
||
| − | ![[File:Icon_Speed.png]] |
||
| − | ![[File:Icon_Hull.png]] |
||
| − | ![[File:Icon_AntiSquadronAttackDice.png]] |
||
| − | ![[File:Icon_AntiShipAttackDice.png]] |
||
| − | ![[Squadron Keyword|Squadron Keywords]] |
||
| − | !Special |
||
| − | Rules |
||
| − | !Defense |
||
| − | Tokens |
||
| − | |- |
||
| − | |[[A-wing Squadron]] |
||
| − | |11 |
||
| − | |5 |
||
| − | |4 |
||
| − | |[[File:Icon_Die_Blue.png]][[File:Icon_Die_Blue.png]][[File:Icon_Die_Blue.png]] |
||
| − | |[[File:Icon_Die_Black.png]] |
||
| − | |[[File:Icon_SQKey_Counter.png]]''[[counter|'''<nowiki/>''']]'''[[swarm|Counter]]'''''2 |
||
| − | | |
||
| − | | |
||
| − | |- |
||
| − | |•[[Tycho Celchu A-wing Squadron]] |
||
| − | | |
||
| − | | |
||
| − | | |
||
| − | | |
||
| − | | |
||
| − | | |
||
| − | |"You can move out of [...] attack ships even wh[...]''"'' |
||
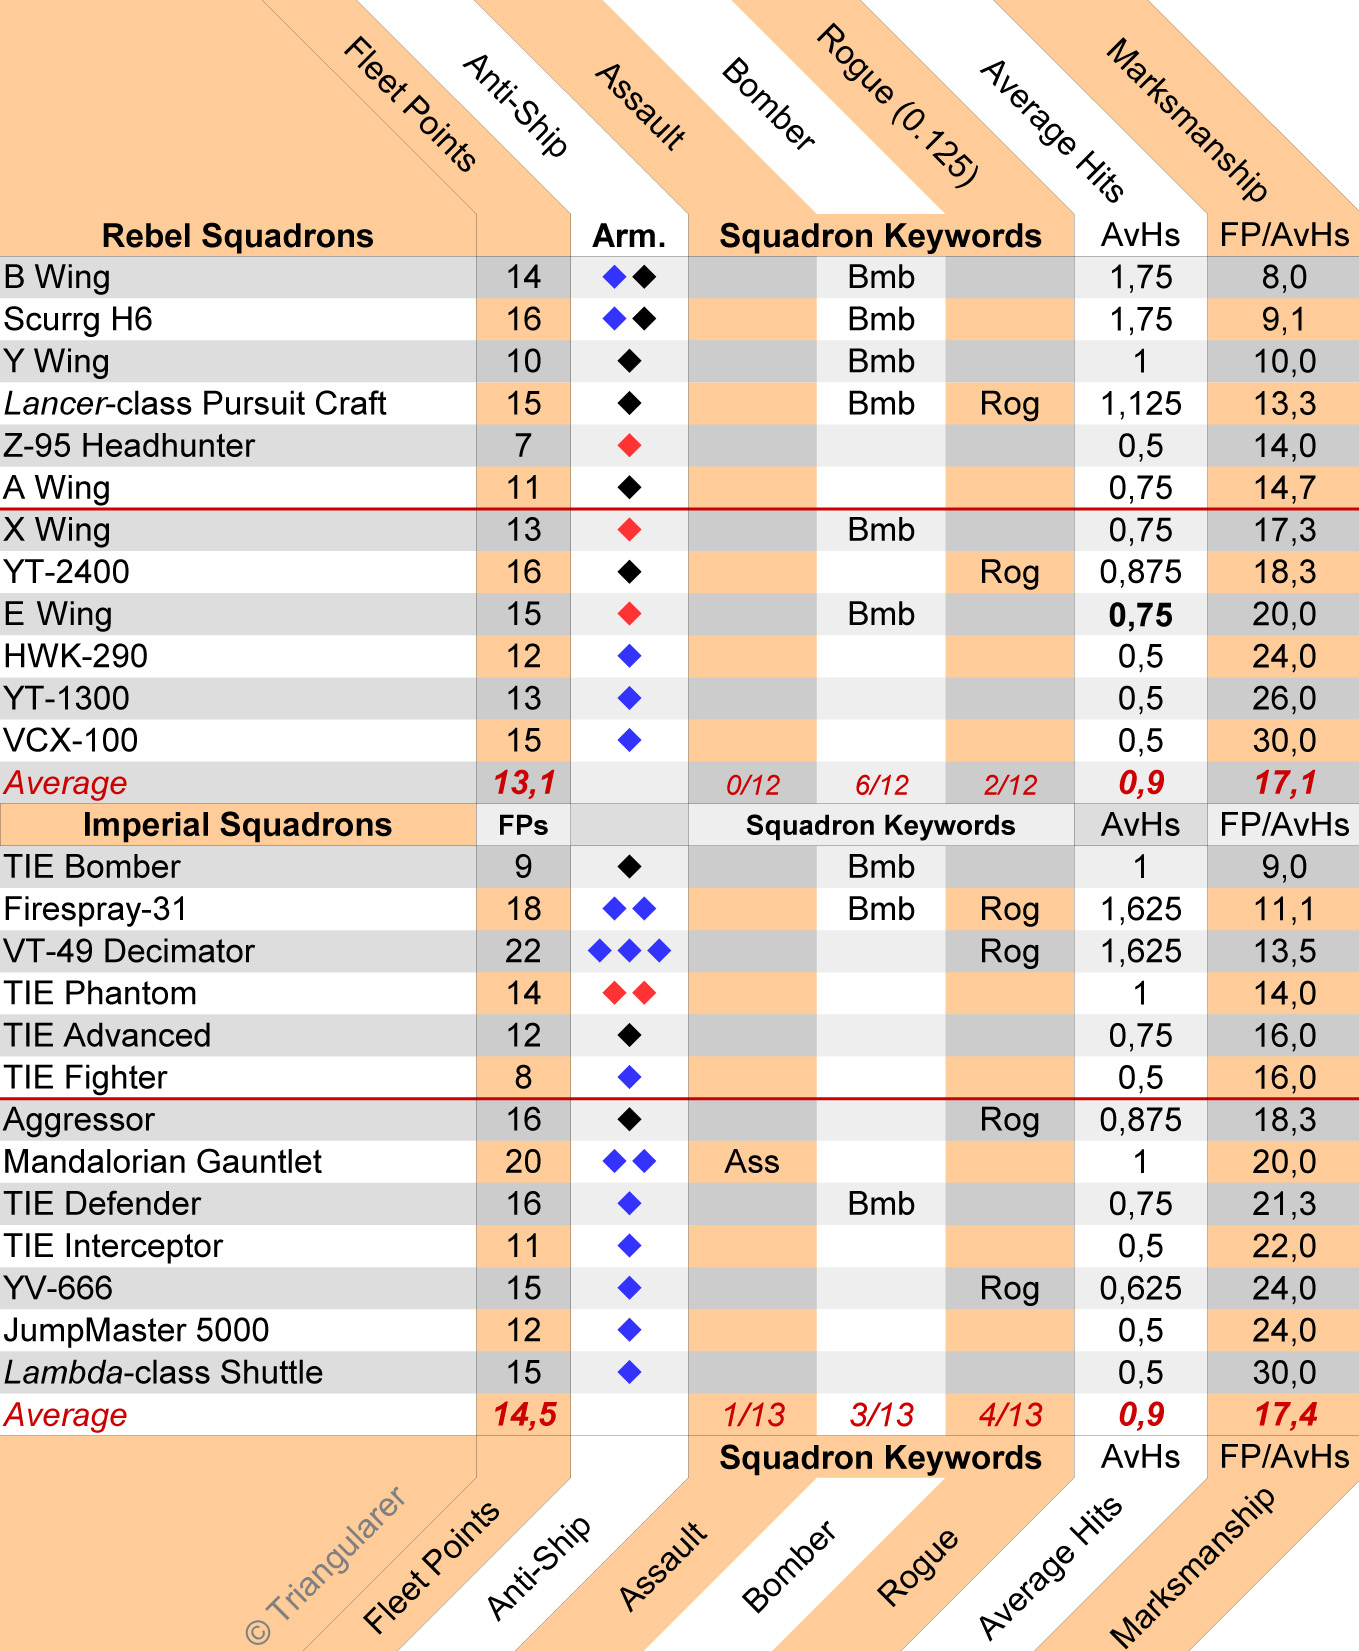
| + | [https://vignette.wikia.nocookie.net/starwars-armada/images/7/7f/SquadCompChart_Wiki_all.jpg/revision/latest?cb=20180124154552 See full size image]. |
||
| − | (Probably "You can move out of engagement and/or attack ships even while engaged.") |
||
| + | See also: [[Ship Comparison Chart]] |
||
| − | |[[File:Icon_DefToken_Brace.png]] [[File:Icon DefToken Scatter.png]] (probably) |
||
| + | |||
| − | |- |
||
| + | == Overview generic squadrons == |
||
| − | |[[B-wing Squadron]] |
||
| + | [[File:SquadCompChart Wiki generics.jpg|676x676px]] |
||
| − | |14 |
||
| + | |||
| − | |2 |
||
| + | == Comparison by Speed == |
||
| − | |5 |
||
| + | [[File:SquadCompChart Wiki speed.jpg|640x640px]] |
||
| − | |[[File:Icon_Die_Blue.png]][[File:Icon_Die_Blue.png]][[File:Icon_Die_Blue.png]] |
||
| + | |||
| − | |[[File:Icon_Die_Black.png]][[File:Icon_Die_Blue.png]] |
||
| + | == Comparison by Hull == |
||
| − | |[[File:Icon_SQKey_Bomber.png]] '''[[bomber|Bomber]]''' |
||
| + | [[File:SquadCompChart Wiki hull.jpg|681x681px]] |
||
| − | | |
||
| + | |||
| − | |[[Brace|<nowiki/>]][[Redirect|<nowiki/>]] |
||
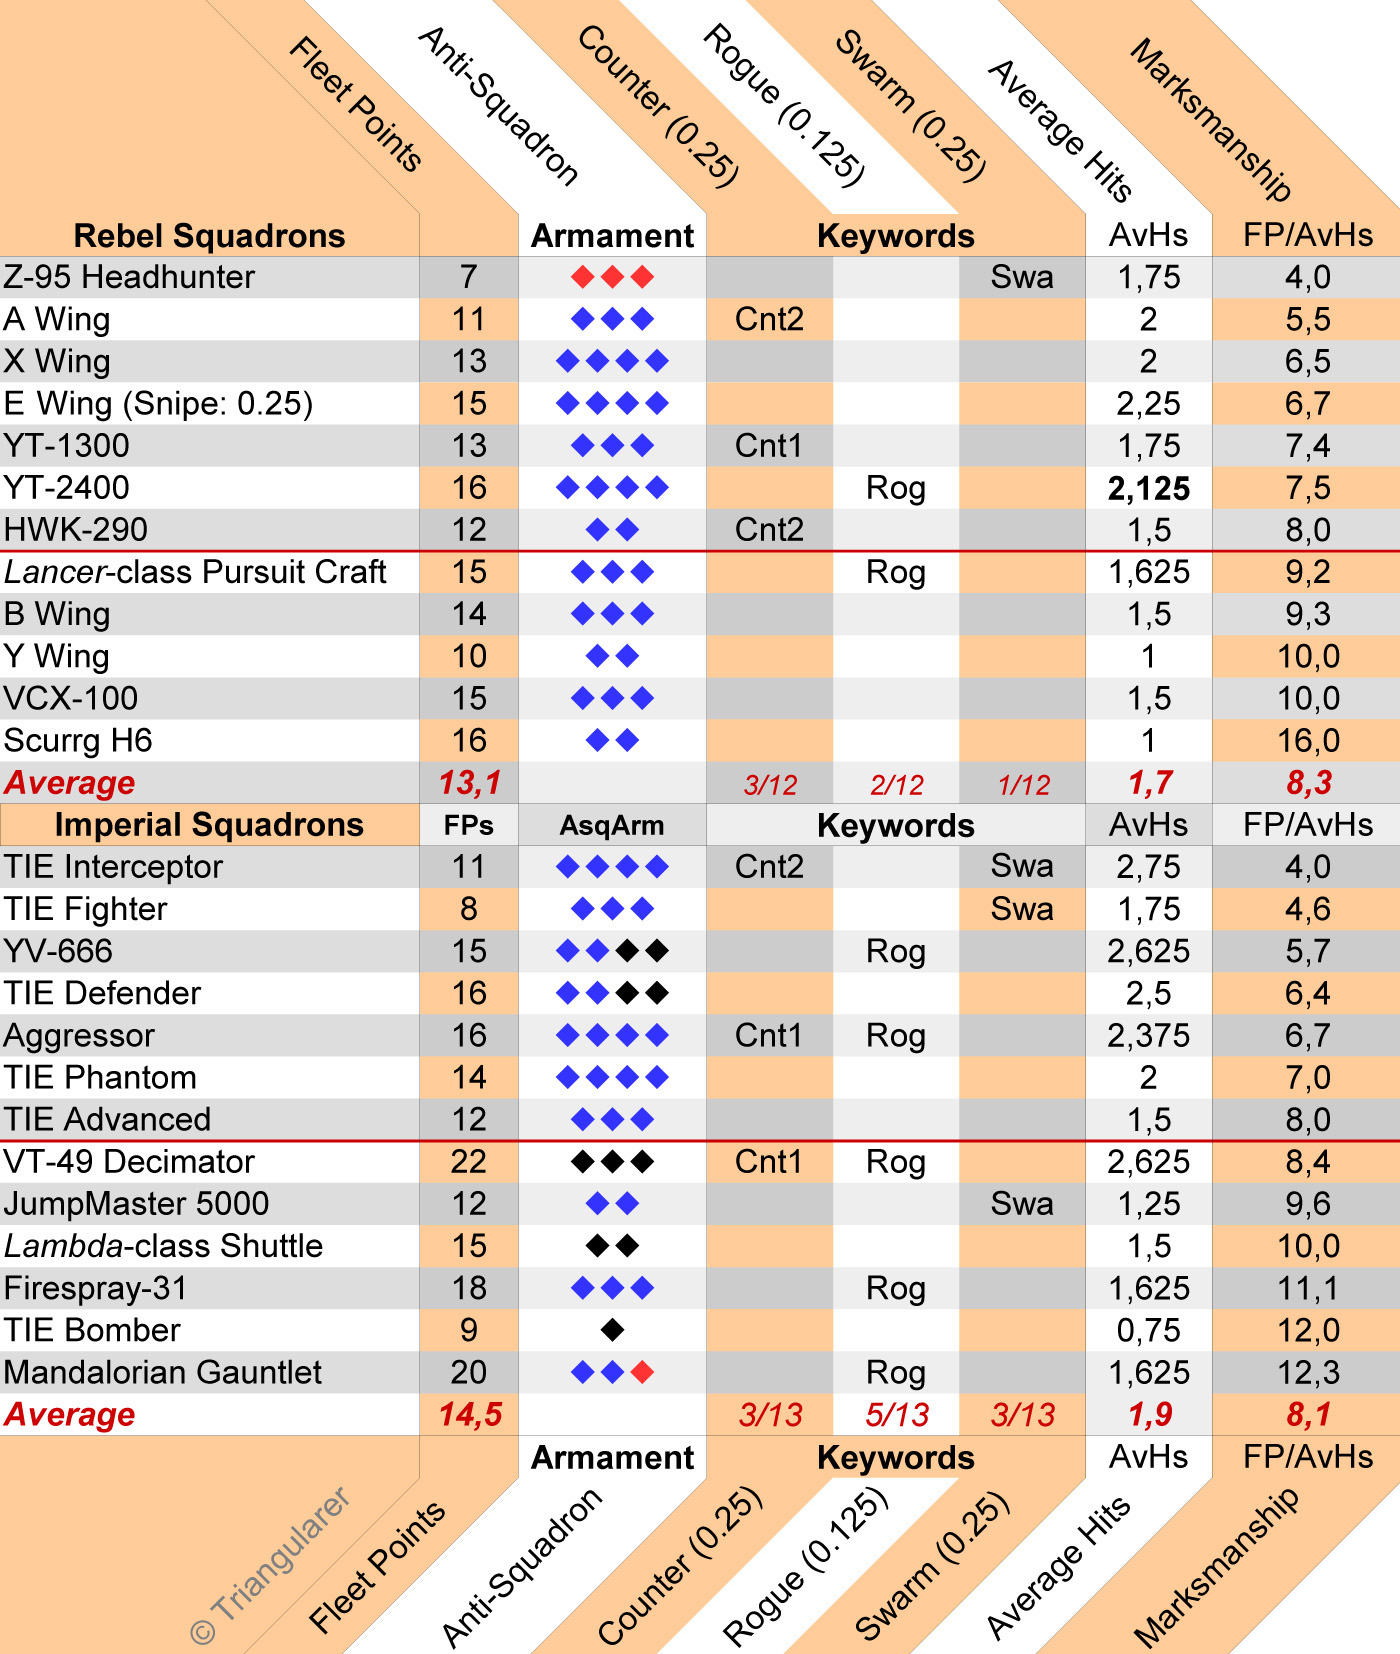
| + | == Comparison by Anti-Squadron Armament == |
||
| − | |- |
||
| + | [[File:SquadCompChart Wiki antisquad.jpg|531x531px]] |
||
| − | |•[[Keyan Farlander B-wing Squadron]] |
||
| + | |||
| − | |20 |
||
| + | == Comparison by Anti-Ship Armament == |
||
| − | |2 |
||
| + | [[File:SquadCompChart Wiki antiship.jpg|571x571px]] |
||
| − | |5 |
||
| + | [[Category:Overview]] |
||
| − | |[[File:Icon_Die_Blue.png]][[File:Icon_Die_Blue.png]][[File:Icon_Die_Blue.png]] |
||
| − | |[[File:Icon_Die_Black.png]][[File:Icon_Die_Black.png]] |
||
| − | |[[File:Icon_SQKey_Bomber.png]] '''[[bomber|Bomber]]''' |
||
| − | |"While attacking a ship, if the defending hull zone has no shields, you may reroll any number of dice in your attack pool." |
||
| − | |[[File:Icon_DefToken_Brace.png]] [[File:Icon_DefToken_Brace.png]] |
||
| − | |- |
||
| − | |[[X-wing Squadron]] |
||
| − | |13 |
||
| − | |3 |
||
| − | |5 |
||
| − | |[[File:Icon_Die_Blue.png]][[File:Icon_Die_Blue.png]][[File:Icon_Die_Blue.png]][[File:Icon_Die_Blue.png]] |
||
| − | |[[File:Icon_Die_Red.png]] |
||
| − | |[[File:Icon_SQKey_Bomber.png]] '''[[bomber|Bomber]]'''[[File:Icon_SQKey_Escort.png]] '''[[escort|Escort]]''' |
||
| − | | |
||
| − | | |
||
| − | |- |
||
| − | |•[[Luke Skywalker X-wing Squadron]] |
||
| − | |20 |
||
| − | |3 |
||
| − | |5 |
||
| − | |[[File:Icon_Die_Blue.png]][[File:Icon_Die_Blue.png]][[File:Icon_Die_Blue.png]][[File:Icon_Die_Blue.png]] |
||
| − | |[[File:Icon_Die_Black.png]] |
||
| − | |[[File:Icon_SQKey_Bomber.png]] '''[[bomber|Bomber]]'''[[File:Icon_SQKey_Escort.png]] '''[[escort|Escort]]''' |
||
| − | |"While attacking a ship, treat the defender as having no shields." |
||
| − | |[[File:Icon_DefToken_Brace.png]] [[File:Icon_DefToken_Brace.png]] |
||
| − | |- |
||
| − | |•[[Wedge Antilles X-wing Squadron]] |
||
| − | |19 |
||
| − | |3 |
||
| − | |5 |
||
| − | |[[File:Icon_Die_Blue.png]][[File:Icon_Die_Blue.png]][[File:Icon_Die_Blue.png]][[File:Icon_Die_Blue.png]] |
||
| − | |[[File:Icon_Die_Black.png]] |
||
| − | |[[File:Icon_SQKey_Bomber.png]] '''[[bomber|Bomber]]'''[[File:Icon_SQKey_Escort.png]] '''[[escort|Escort]]''' |
||
| − | |"While attacking an activated squadron, you may add 2 blue dice to your attack pool." |
||
| − | |[[File:Icon_DefToken_Brace.png]] [[File:Icon_DefToken_Brace.png]] |
||
| − | |- |
||
| − | |[[Y-wing Squadron]] |
||
| − | |10 |
||
| − | |3 |
||
| − | |6 |
||
| − | |[[File:Icon_Die_Blue.png]][[File:Icon_Die_Blue.png]] |
||
| − | |[[File:Icon_Die_Black.png]] |
||
| − | |[[File:Icon_SQKey_Bomber.png]] '''[[bomber|Bomber]]'''[[File:Icon_SQKey_Heavy.png]] '''[[heavy|Heavy]]'''''<nowiki/>'' |
||
| − | | |
||
| − | | |
||
| − | |- |
||
| − | |•[["Dutch" Vander Y-wing Squadron]] |
||
| − | |16 |
||
| − | |3 |
||
| − | |6 |
||
| − | |[[File:Icon_Die_Blue.png]][[File:Icon_Die_Blue.png]][[File:Icon_Die_Blue.png]] |
||
| − | |[[File:Icon_Die_Black.png]] |
||
| − | |[[File:Icon_SQKey_Bomber.png]] '''[[bomber|Bomber]]'''[[File:Icon_SQKey_Heavy.png]] '''[[heavy|Heavy]]''' |
||
| − | |"When a squadron you attack suffers at least 1 damage, you may toggle its activation slider to the activated side. If it was already |
||
| − | activated, it suffers 1 additional damage instead." |
||
| − | |[[File:Icon_DefToken_Brace.png]] [[File:Icon_DefToken_Brace.png]][[Redirect|<nowiki/>]] |
||
| − | |} |
||
Revision as of 09:47, 8 October 2018
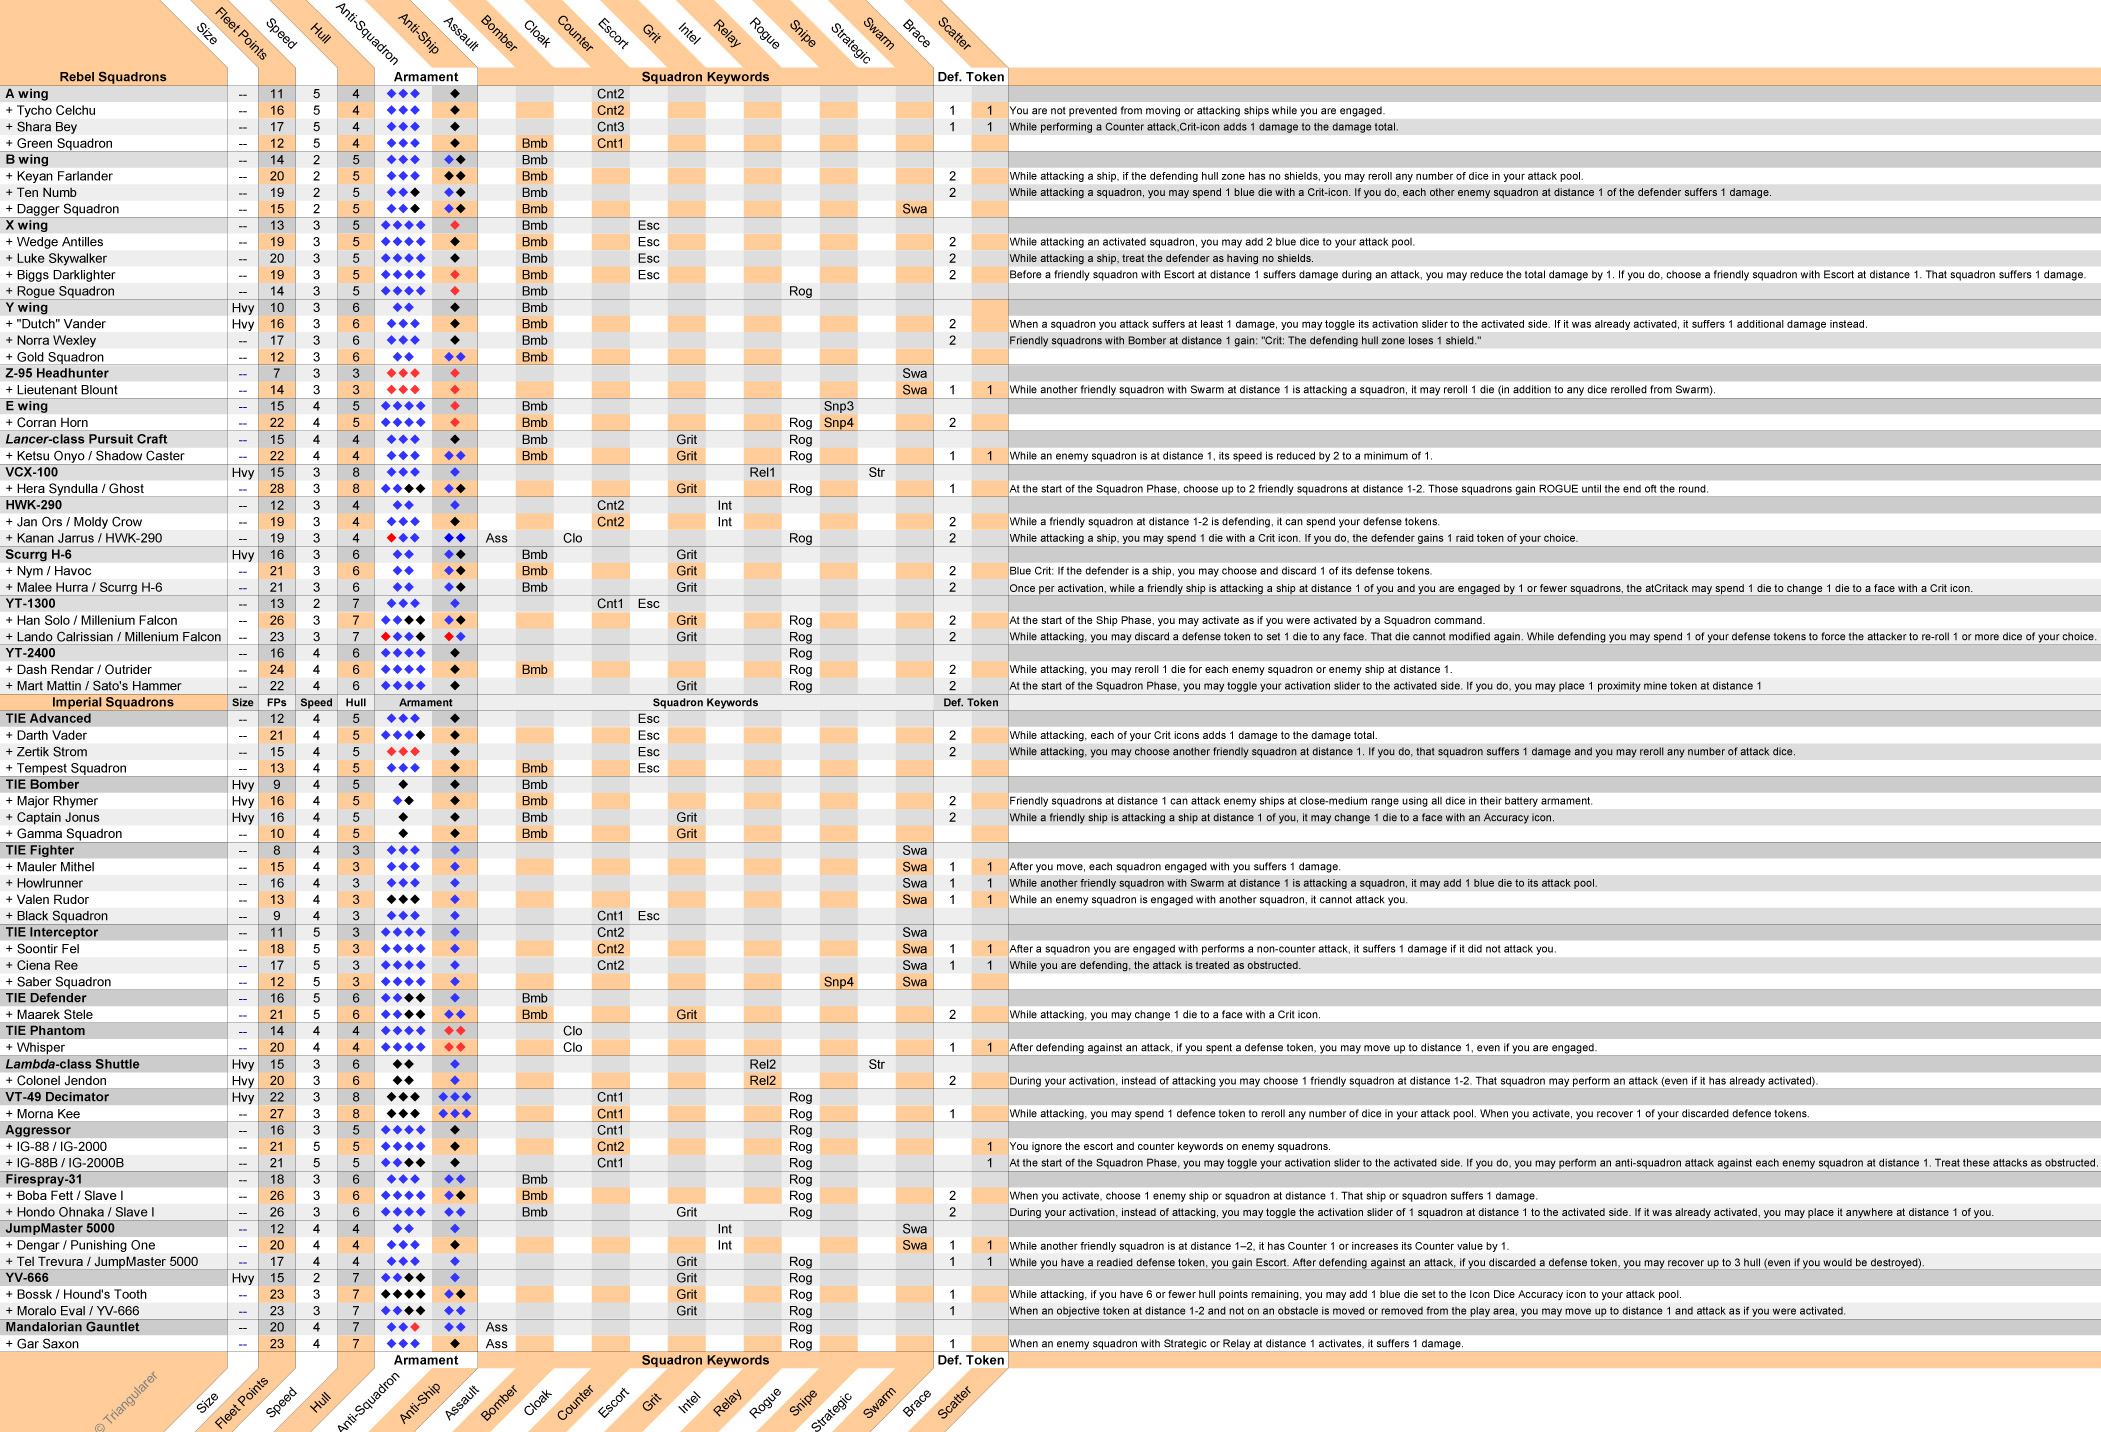
These charts are intended to provide quick comparisons between squadron stats.
Overview all squadrons
See also: Ship Comparison Chart
Overview generic squadrons

Comparison by Speed

Comparison by Hull

Comparison by Anti-Squadron Armament
Comparison by Anti-Ship Armament