How-to Play "Measuring firing arc, range, distance, LOS & Obstruction" - Star Wars Armada Explained
A video from SWAE - Star Wars Armada Explained - by Karneck
Rule[]
To perform an attack, the target (either hull zone of a ship or squadron) must be inside the attacking hull zone’s firing arc. In addition, the defending hull zone must be at attack range.
Firing Arc[]
Each ship token has four printed firing arc lines which define its four firing arcs, one for each hull zone. A huge ship has six firing arcs.p.7 Some ships have a special battery armament and one or more special firing arcs.p.18
- Firing arcs are infinite; they do not end at the end of the range ruler.
- A firing arc includes the width of the firing arc lines that border it.
- Each squadron has a 360° firing arc.
Source: RRG 1.5.0 p.6/7/18


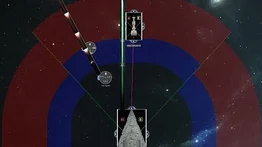
Example: Front Firing Arcs of a Nebulon-B and CR-90 B aiming at a Victory-class Star Destroyer.
The attacker uses the range side of the range ruler to determine line of sight and the range to the chosen hull zone. Each range band on the ruler depicts which colors of attack dice he can roll. (Long = red dice; Medium = red and blue dice; Close = red, blue, and black dice.)
For example, at long range a ship can roll only its red attack dice. If the attacking hull zone does not have any red dice, then it cannot perform this attack. (Like the CR90 B in the picture.)
When measuring attack range for a ship, ignore any portion of the defender that is outside the attacking hull zone’s firing arc, even if that portion is at a closer range.*
* see: FAQ Version 4.1.1; 2018/04/23 p. 5